How to re-upholster furniture

Photographic Guide to Re-uphostering A Couch
Trying to decide to do it yourself or pay someone? Not sure where to start? This guide is intended to give you a quick idea of what is involved in recovering your old sofa. Re-upholstery is not easy and the example shown is of a very streamline couch that doesn't require a lot of sewing knowledge (in fact it was a no-sew project the way I covered it). The more curvy and ornate your sofa, the more difficult the recovery process. I don't know if you'll be able to learn how to recover a couch by reading this lens but you should be able to get a good idea of if this is something you can attempt yourself or if you want to hire someone. I put out a couple RFPs (Request For Proposal) on re-upholstery and decided it was at least worth giving the task a try first; especially since I happened across a bolt of high quality pet friendly upholstery fabric at goodwill for only $15 dollars (and still have enough left over to cover a chair, make pillows, etc). Maybe you can luck out and find a great deal too.
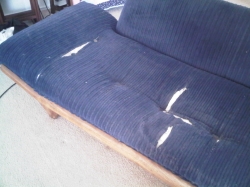
Damaged Couch - Time for a change.

This couch belonged to my grandmother; it is from the 50s and has been recovered at least twice; with this being the third time. The blue fabric that is being partially removed is a blue corduroy. It is a very pretty fabric but sticks to pet fur like a magnet. I don't know how my grandmother kept it clean with her cat; she much have vacuumed it daily.
Step 1: Remove Fabric and Attachements - Save discard fabric as template for new fabric.

While this is listed as just one step this is a huge process and, in my opinion, the hardest step in recovering a couch. Your hands are going to hate you as you pry out old staples one by one. SAVE OLD FABRIC FOR USE AS TEMPLATE IN LATER STEPS.

Often the flat head screwdriver isn't enough and you have to pry out the staples with pliers. You'll probably also need to remove screws, bolts, and possibly even giant staples. So, try to figure out what tools you will need before starting so you don't have to run to the store when you are already covered in whatever stuff fell inside your couch over the years.
Step 2: Save or Replace Foam - What should I do?

If the foam and batting is still clean, doesn't smell, and is not broken down you can save it. This couch has always been in a smoke free house, spills were always cleaned up quickly, and still had a surprisingly good shape to it. So, I was able to save the foam. There was one butt indent area from too many hours playing video games. This was corrected by laying down a new layer of thick batting. Next time this couch is recovered it will need new foam and batting as keeping it was a borderline decision (but I don't want to waste something that still has life in it). In the above photo the foam/batting is shown flipped upside down next to the couch frame. This was the easiest way to keep the foam together while I worked on the rest of the couch.
Step 3: Repair or Replace Supports

The support bands (there may be a more technical word for these) were in pretty good shape aside from being stretched in some places. So, I decided to just pry them off one side, stretch them out again (done by hand) and use a staple gun to re-attach. This decision was made for two reasons. Main reason, someone had bought out all the support materials from my local supply stores and I needed to get the project done faster than they would be restocked. Secondary reason, it was hard enough to pry up one side of the bands, I didn't want to have to pry up both sides unless I had to. I think I'd suggest replacing them if you are willing and able; but so far so good the re-stretched old bands are holding up just fine.
Step 4: Streach New Batting Over Padding - The easiest step!

Just lay the batting over the couch. Starting from the center of the long sides staple out to the ends. Batting is forgiving and will stretch to fit. No need to go overboard on staples since the fabric will also be stapled over it.
Step 5: Cut New Fabric To Size - Use old pieces as template, cut about 5" too large all the way around.

Step 6: Cover it - Work from the center to sides, front to back.

I just threw the fabric over the base and started stapling making sure to keep the fabric pulled hand tight at all times. Keep a flat head screwdriver and pliars handy in case you need to remove a staple to adjust the fabric. Start by spacing your staples every 6 inches then go back and fill in every two inches (or more) after the fabric is positioned where it needs to be.

To make my life easier and because of the type of fabric I was using, I opted for a contemporary look. By that I mean that I folded the sides and stapled them down instead of trying to cut out a dart to fit the corner then sew it back together. It took a few tries to determine how I wanted to fold it but the end result turned out nicely. However, I do not suggest the folding technique for all couches nor does it fit all styles of decor. In most cases you are going to have to break out a needle and thread.

The wrinkles above is what happens when you sit on a couch that is covered in this manner and doesn't have any buttons keeping the fabric in place. So, you may opt to secure the fabric with upholstery buttons if you have a long span of area that is covered. With this couch we know from experience that the buttons created a place for dirt to become trapped, so we opted to not add them back. The wrinkles are easily smoothed out by hand. But we could only get away with this because this is a very sturdy fabric (it could probably be used on outdoor projects).
Step 7: Put It All Back Together

For the exposed back of the sofa, I folded a piece of fabric over and pinned it into position. After it was pinned exactly where it needed to be I used decorative nails (found at any home decor or fabric store) to secure it in place.

Use a tape measure to make sure spacing is accurate. Rubber mallets must be used with decorative nails as regular hammers will damage their appearance.
Finished!

As you can see, I opted to keep the old blue fabric on the pillows and across the front trim. I have two blue chairs (not visible in view) and this helped to tie the couch into the overall room. I originally planned on replacing all the old fabric but liked this look and decided to stay as is for at least a while. As I am able to further blend the gray in with the rest of the room decor I may opt to further change the couch design. If I do replace the pillows it will be with one large pillow instead of the 3 smaller pillows. If I make that change I will post new pictures.


")


